TDD in a Nutshell
Introduction
In this lesson, we’re going to learn how to write unit tests, but following the Test Driven Development process.
Test-driven development is a way of structuring our development process. If we’re not following the test-driven development process we usually first write application code and once our application code is ready we write unit tests to test the written application code. But in the test-driven development process we first need to write the unit test and then once we have a unit test we write application code to make this unit test pass.
Test Driven Development Lifecycle
When following the TDD process to write application code, we will follow 4 important steps that define the test-driven development lifecycle.
- Red
- Green
- Refactor
- Repeat

1. Red
The first step in the TDD lifecycle is called red and it is called red because the color of a failed unit test is red. At this step before writing any application code we first need to write a unit test. Once we have this unit test it will fail because there is no application code it can test. So once we have a failing unit test, the next step will be to write the application code to make this unit test pass. Also at this step, it is a good practice to write a minimum amount of code just enough for your unit test to fail. As soon as your unit test does not compile, it is time to stop writing the unit test, switch to application code and add just enough code to make the unit test compile again.
2. Green
The next step in the TDD lifecycle is called green and it is called green because the color of a passing unit test is green. At this step, we need to write application code to make our failing unit test pass. Once the unit test passes its color will turn green and we can continue to the next step in the test-driven development lifecycle which is ‘refactor’.
3. Refactor
This step is called refactor because at this step we need to clean up both unit test code and application code for it to look and work nice. So at this step, we need to review our unit test code and application code and see if there’s anything that can be improved. If there is something that can be improved, adjust it, then it is done at this step. For example, you can double-check how your test method is called, how method variables are called, and if there’s any code that is repeated and can be reused.
4. Repeat
The final step in the TDD lifecycle is called repeat. At this step we need to pick up the next piece of our application functionality and implement it by repeating the previous three steps. First, we write a new unit test that will initially fail. The second step is to write application code to make that unit test pass. And the third step is to refactor that unit test code and the application code to make it look and work well.
Follow the TDD Process Step by Step
Hands-on practice with TDD in Java
To demonstrate the TDD process step by step, here in this example I’ve used a maven-based java project that does not have any application or test code and also have added JUnit dependency to the pom.xml file to be able to write Junit test cases.

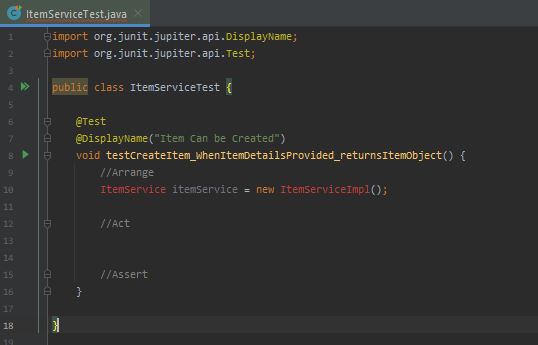
For this example consider you’re going to implement the business logic of simple Item creation functionality using the TDD process. So first you need to create a new test class inside the Java folder in the test directory and start creating a new test method.

Here you can see we’ve created an empty test method called testCreateItem_WhenItemDetailsProvided_returnsItemObject. so we are going to work on these testCreateItem, WhenItemDetailsProvided and returnsItemObject each part sequentially as per the name of the test method. If you’re not familiar with the unit test method naming convention I recommend you refer to this article.
testCreateItem_
- Red: This test method starts with testCreateItem where createItem is the name of the method under test. this means that this test method will be testing code in the method that is called
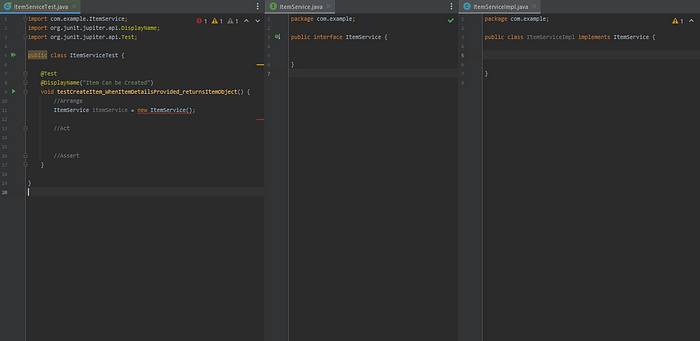
createItem(). we’ll need to create this method, but a method cannot exist without the class. so we need to create the class first. So in the arrange section we’ll need to create an object of this new class which isitemServiceto create a new instance of this class.
- Now you can see this code does not compile, which means that we need to stop writing our code and fix this problem first.
Remember that in the TDD approach, we stop working on a test method as soon as it does not compile or fails.
- Green: To fix it, we’ll need to create a class that is called
ItemService. So in our application code, in the main java folder, we need to create a new class or a new interface first. It is a good code in practice to use interfaces for our service classes and the technique is called code to interface. And later in this project, you will see how it is helpful. So here, I’ve created the new interface and a class that implements the interface calledItemServiceImpl.
- However, the code in the
ItemServiceTestclass still does not compile. And this time it is because we’re creating a new instance of theItemServiceinterface. We need to be creating a new instance of a class that implements theItemServiceinterface which isItemServiceImplin this case. So we need to change it in the test method.
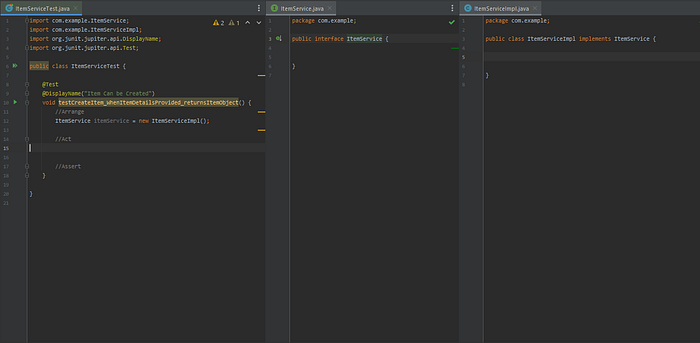
- Now code compiles and that means we can continue working on this test method.
At this point, we’ve completed one single TDD life cycle(red, green, refactor). we’ve not done refactor step in this cycle because there wasn’t anything that can be improved since we’ve written only less code. So now we’re going to pick up the next piece of our application functionality(_WhenItemDetailsProvided_) and implement it by repeating the previous three steps.
- So following this approach we need to work on both
_WhenItemDetailsProvided_and_returnsItemObjectparts to complete the functionality. By end of the this cycling process, you’ll have completed functionality(method) along with the test case, and once the test case is executed this test method should pass.
Thank you for staying until the end of this article. If you enjoyed reading it, please press that clap👏 a few times, leave a comment and please share if you think this article will help someone else as well.
If you’re interested in more articles like this, Follow me on Medium!